olansi logo blue 4

W51C Product Instruction

w51 ro water dispenser

1. Product parameters (W51 + W51(G) + W51C)

Product NameReverse Osmosis Water Dispenser
Product ModelW51W51(G)W51C
Rated Voltage/Frequency110V/60Hz220V-240V~; 50Hz/60Hz220V-240V~; 50Hz/60Hz110V/60Hz220V-240V~; 50Hz/60Hz
Rated Power1600W2200W2200W150W150W
Rated Heating Power1500W2100W2100W
Rated Cooling Power70W70W70W90-120W90-120W
Chilled Water Capacity0.5L/h (≤15℃)0.5L/h (≤15℃)0.5L/h (≤15℃)1.2L/h (≤12℃)1.2L/h (≤12℃)
Water Heating Capacity12L/h (≥90℃)18L/h (≥90℃)18L/h (≥90℃)
Water Production Flow15.6L/H
Working Pressure0.4~0.6MPa
Applicable Water SourceCity Water
Applicable Water Temperature5-38℃
Water Tank Capacity4.8L
Net Weight8.7 kg7.6 kg8.7 kg
Gross Weight12.2 kg10.4 kg12.2 kg
Dimensions417×231×376mm

2. Use Operation of the Product

2-1 Preparation Description before Use

Make sure that the product has been installed and activated as required by the installation guidelines.

2-2 Introduction to the User Interface

w51 body control panel 1 w51c

3. Operation guideline

1operation guideline

Step 1: Place water purifier in flat place such as desktop or cabinet countertop;

2operation guideline

Step 2: Remove the water tank, open the water tank cover, and add fresh tap water to the MAX (maximum water level) line in the two water compartments of the original water tank. Install the water tank on the machine and cover it with the water tank cover;

3operation guideline

Step 3: Plug the power plug into the AC power supply (110V~ 60Hz/230V~ 50Hz) socket, power on, and long press “Power” for two seconds to turn on the machine, and then the machine will start backwashing the filter element, and producing water by itself. Please wait patiently for about 5 minutes;

4operation guideline

Step 4: Rinse the filter element. In order to obtain excellent water quality and mouthfeel, Long press 3 seconds “Flushing” into the rinse mode, began to carry out the cartridge rinse, the outlet placed at the receiving container (such as: bucket, etc.) to receive water, until “Flushing” no longer flashing after this time, the smart wash is complete.

5operation guideline

Step 5: Pull out the plug at the rear of the machine and place a container (such as a bucket) at the outlet to connect it. Wait for the water in the cold tank to be drained before plugging the plug. Pour out the remaining concentrated water in the original water tank, refill the two water compartments of the original water tank to the MAX (maximum water level) line, and install the water tank on the machine after the replenishment is completed.

6operation guideline

Step 6: Power on again for ice water activation, and place a water Step 2 Then press down on the latch with your finger or a screwdriver container at the water outlet (such as: a bucket, etc.) to receive water, click the “ICE WATER”button to exhaust the air first. If there is water coming out of the water outlet within 30 seconds, the ice water will be activated successfully.
(Note: During the activation period, the machine is working normally, please do not power off. It is normal to produce abnormal air spraying noise during the period)

4. Plug removal steps

1 plug removal steps
Step 1: First pull out the lanca
2 plug removal steps
Step 2: Then press down on the latch with your finger or a screwdriver
1 plug removal steps

Step 3: At the same time, pull out the plug with the other finger

Notice:
1. When the water comes out, if you touch any water temperature button, the water release will be stopped.
2. During the draining process, a small portion of water will seep out along the perimeter of the spout, please wipe it with a dry cloth.
3. The water tank is removed and refilled with water and then installed on the machine.
4. In the water tank and machine docking process, a small amount of water oozing out of the joint, is a normal phenomenon, oozing out of the water, please use a dry cloth to wipe. Please use a dry cloth to wipe the water.

5. Maintenance of the Machine

5-1 Regular Cleaning of the Equipment

In order to confirm that your reverse osmosis machine can operate normally, please perform regular maintenance.

If the equipment has not been used for a long time, please perform a smart wash and rinse before re-use (see 3.3 Function Operation Guidelines for details); in addition, in order to obtain better mouthfeel, it is recommended to perform a smart wash operation regularly once a month.

5-2 Replacing the Filter Element

There is no need to replace the filter element for the first installation and use of the machine. When the recommended service life of the filter element expires, please replace it with a new filter element.

5-3 Function of filter element

Filter element for short Type of filter element Function Recommended replacement period
PAC Folding PP cotton activated carbon rod composite filter Removal of impurities such as silt, rust, sand, suspended solids, and blood worms; removal of residual chlorine and absorption of disagreeable tastes and odors. 6-12 months
ROC Reverse osmosis filter element Filter precision of 0.0001 μm, removal of incrustation and heavy metal 12-24 months

5-4 Filter Disassembly Guide

1 guidelines for disassembly and assembly of the filter element

Step 1: Disconnect the power, open the water tank cover, and push the top cover of the machine backwardly.

2 guidelines for disassembly and assembly of the filter element

Step 2: Rotate the filter element counterclockwise and take It out upward;

Step 3: Assemble the new filter element and rotate it clockwise to tighten it;

3guidelines for disassembly and assembly of the filter element

Step 4: Press and hold the key “Filter element reset” for 3 seconds to enter the filter element selection, and the indicator flashes. Touch the cycle to select the filter element 1-2, with the selected filter element flashing. Press and hold again for 3 seconds to reset the service life of the filter element.

Note: Original filter element must be used for replacement to ensure the safety of drinking water. For any abnormal situation during the replacement of filter element, please contact the customer service center in time.

5-5 Moving the Machine

If you need to move the machine, please drain the water first to avoid water leakage causing damage to the equipment during the bumpy transportation process.

13moving the machine
1. Lift the raw water tank, pour out the water in the water tank, and dry the raw water tank.
12moving the machine

2. Long press “Flushing”+“Water output” empty the machine’s pure water tank after 180 seconds.

11moving the machine

3. Pull out the plug of the cooling tank, empty the water in the cooling tank,and then put the plug well.

6. Fault elimination

6-1 Trouble shooting

If your machine fails, please refer to the help information in the following table first. If the problem cannot be solved, please contact the local maintenance department.

FaultReason
The machine cannot produce water1. Check whether the raw water tank has water
2. Is the filter element too dirty and blocked, or is the filter element not installed in place
Water flow is smallerCheck whether the filter element is too dirty or used beyond the service life
Water does not taste good1. Check whether the parts on the machine have been dismantled without authorization
2. Check whether the parts at the seepage place are screwed tightly, staggered in teeth or slide
Electricity leakage and induced electricity of machine body1. Poor grounding of the water machine or the machine has a water leakage
2. Whether the silicone seal at the water seepage is aged or damaged
Machine does not heat1. Is your dispenser connected to the power supply
2. The temperature-controlled protector on the heating barrel is not reset.
Machine is not cooling1. Is your dispenser connected to the power supply
2. Did you turn off the cooling function?

If the power cord is damaged, it must be replaced by a professional from the manufacturer, maintenance department or similar department in order to avoid danger. Avoid pinching,folding, knotting or damaging the power cord.

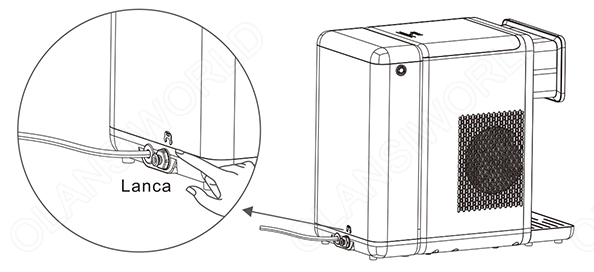
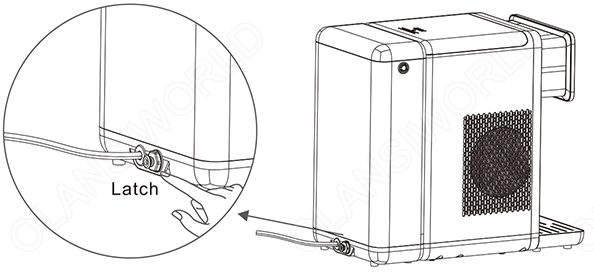
It must be installed by professionals. Disassembling parts on the product yourself may damage the product or cause electric shock. Moving and handling by yourself may cause improper operation and damage to the machine.

6-2 Fault description

After the fault occurs, please remember the code first and turn off the power.

Fault codeReasonProcessing mode
Fault E1After 120 minutes continuously of water purifying, the tank is not fully filledCheck for any leaks
Is the raw water tank short of water
Is the filter element installed in place
Fault E5Communication fault, fault light on + “E5”.Re-power on.

Certifications
OLANSI Repsects Quality Standards

Certifications
OLANSI Repsects Quality Standards

OLANSI
OLANSI HEALTHCARE CO.,LTD
WhatsApp
邮箱

Need Help?

I’m Here To Assist You

Something isn’t Clear?


Feel free to contact me, and I will be more than happy to answer all of your questions.

WATER & Air Purifier Market Size, Share, Analysis, Forecast
Price Value $4000+

Enter you email below, so we can send you this valuable report.