olansi logo blue 4

W19G And W19C-G Product Instruction

产品使用图 w19 pipeline

Product parameters (W19G+ W19 Pro-G + W19C(G))

Product name Reverse Osmosis Hydrogen Rich Water Purifier Dispenser (Tankless)
Product model W19 G W19(Pro-G) W19C(G)
Rated voltage/frequency 110V~ / 60Hz 220V-240V, 50/60Hz 220V-240V, 50/60Hz 110V~ / 60Hz 220V~ / 50Hz
Rated power 1500W 2200W 2200W 1500W 2200W
Rated heating power 1400W 2100W 2100W 1400W 2100W
Electrical power consumption 0.1kW24h 0.1kW24h 0.1kW/24h
Water heating capacity 16L/h(≥90°C) 18L/h(≥90°C) 18L/h(≥90°C) 16L/h(≥90°C) 18L/h(≥90°C)
Water production flow 30L/h 30L/h 30L/h 30L/h 30L/h
Working pressure 0.4~0.6MPa
Applicable water source City water City water City water Tap water Tap water
Applicable water temperature 5-38°C
Net weight 9.6 kg
Dimensions 360x240x430mm
Rated cooling power (Model with refrigeration) 68W 68W 90W-120W 90W-120W
Water cooling capacity 1.2L/h(≤10°C) 1.2L/h(≤10°C)

Schematic diagram of products

产品使用图首图 w19g schematic diagram

Product function introduction

产品使用图 w19 body control panel
W19G , W19C-G
w19 body control panel
W19 PRO-G

Waterway Installation Diagram

w61 waterway installation diagram 6 2
W19G, W19 PRO-G
w19c p waterwayinstallation diagram 1
W19C-G
w19p waterwayinstallation diagram 1
1. After taking the product out of the packing box, place it in a flat place, such as the desktop or cabinet countertop.
w19p waterwayinstallation diagram 2
2. Take out the inlet ball valve, install it on the angle valve, connect PE water pipe and install it on the inlet at the rear of the host. (Note:PE pipe should be inserted tightly.)
w19p waterwayinstallation diagram 3
3. Connect the pipeline according to the stage installation schematic diagram (as shown in the right, see the stage waterway installation diagram for big picture)
w19p waterwayinstallation diagram 4
4. Concentrated water can be discharged directly into the sewer or recycled.

Operation guideline

W19G, W19C-G
w61 waterway installation diagram 6 2

Step 1: After installing the drinking machine according to the installation method on the stage (for the installation method, please refer to the installation diagram’of the waterway on the stage)

w19 operation guideline 4 1

Step 2: Plug in the purifier to power on the electricity. Long press the power key for 2 seconds to start the purifier;

w19 operation guideline 5 1

Step 3: To achieve excellent water with great quality, it is recommended to clean the purifier manually after long press the “Wash” for 3 seconds. Place a water container at the outlet(e.g.: Bucket, etc.).
After 6 minutes, you can operate the purifier for daily use;

Step 4: After the flushing is over, the water purifier starts to make water automatically again, and it can be used normally after the water marking is over.
W19 PRO-G
w61 waterway installation diagram 6 2
Step 1: After installing the drinking machine according to the installation method on the stage (for the installation method, please refer to the installation diagram’of the waterway on the stage)
w19 operation guideline 3 1
w19 operation guideline 4 1
Step 2: Press the snap-fit on the top and the top lid will pop up. Open the lid of pure water tank, add bottled pure water in the hydrogen-rich pure water tank, cover the lid of the pure water tank, and then install its top lid: (Note: lt is strictly forbidden to add tap water, mineral water and filtered water in the hydrogen-rich pure water tank.
Step 3: Plug in the purifier to power on the electricity. Long press the power keyfor2 seconds to start the purifier;
Step 4: To achieve excellent water with great quality, it is recommended to clean the purifier manually after long press the “Wash” for 3 seconds. Place water container at the outlet(e.g.: Bucket etc.) After 6 minutes, you can operate the purifier for daily use;
w19 operation guideline 5 1
Step 5: After the flushing is over, the water purifier starts to make water automatically again, and it can be used normally after the water making is over.

Daily use

When the machine displays” CO₂”, it indicates the need to replace the gas cylinder.
w19 daily use 1

1. Press “Normal” “Warm” “Milk” and other keys;

2. Touch “Water Out” again to directly discharge water;

w19 daily use 2

1. Press “Lock” unlock;

2. Press “Coffee” “Tea” “Hot” and other keys;

3. Touch “Water Out” again to directly discharge water;

w19 daily use 3

1. Press “Normal” “Warm” “Milk” “Coffee” “Tea” “Hot” and other keys, (If you need to “Coffee” “Tea” “Hot”, you need to touch the “lock” to unlock);
2. If you touch the “small cup” and “Big cup” keys, the cup of water corresponding to the water temperature will be output;
3. Touch “Water Out” again to directly discharge water;

Notice:
(1)The dispenser is set with quantitative water-out protection, and the water-out is automatically stopped after more than 1000ml of water came out.
(2)When taking hot water, do not stretch your arms below the outlet in case of scalding.
(3)To prevent dry burning, please flow out some normal temperature water before the first time of dispenser powering and hot water getting.

When the water comes out, you can press any temperature key to stop the water.

Manual Setting Temperature Mode
Long press “boiling water” for 3 seconds, the dispenser enters the temperature regulation mode, digital tube displays“95”. Press “big” to reduce the temperature for 1 degree, and press “big” to raise the temperature for 1 degree. The lowest adjustable degree is 85 degrees. After getting to the desired temperature, no operation for 5 seconds will indicate the prior setting has been completed successfully.

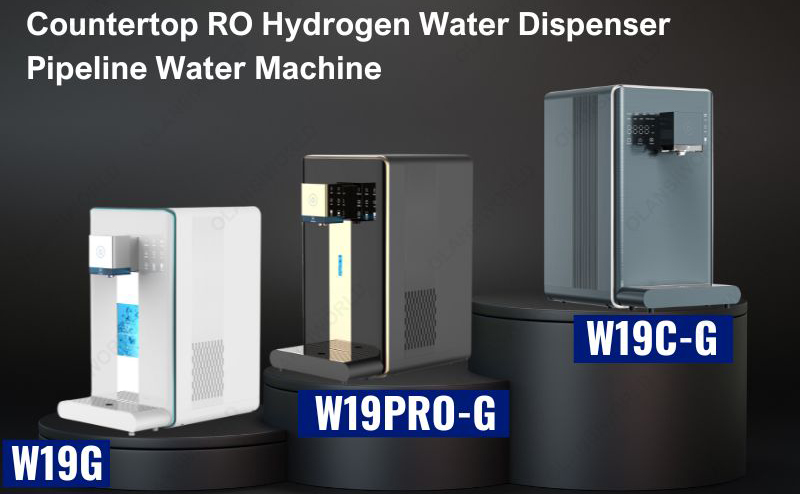
Cooling Function Dispenser —— W19G , W19C-G
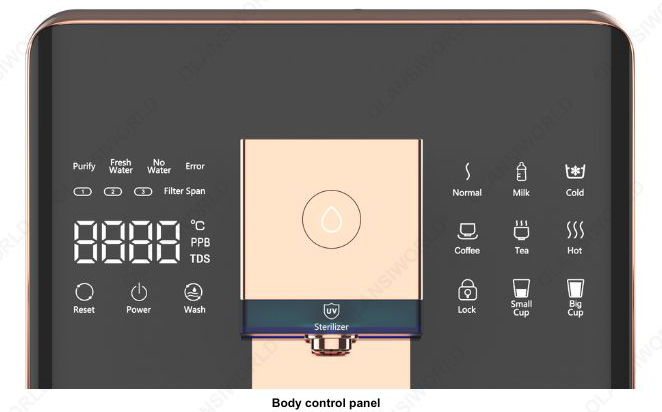
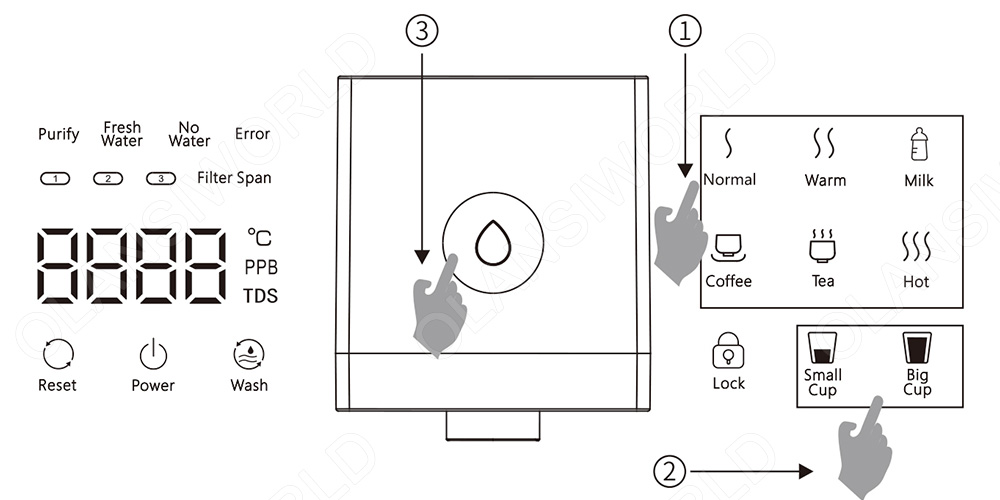
When using the ice water function for the first time, click the ice water button and then press the water outlet button to exhaust air to the pipeline until the water outlet comes out, then stop the water outlet.
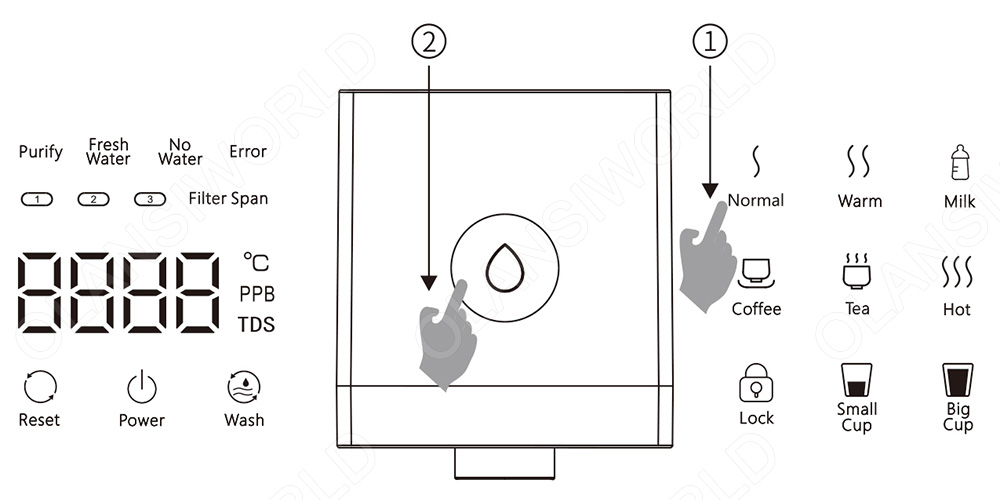
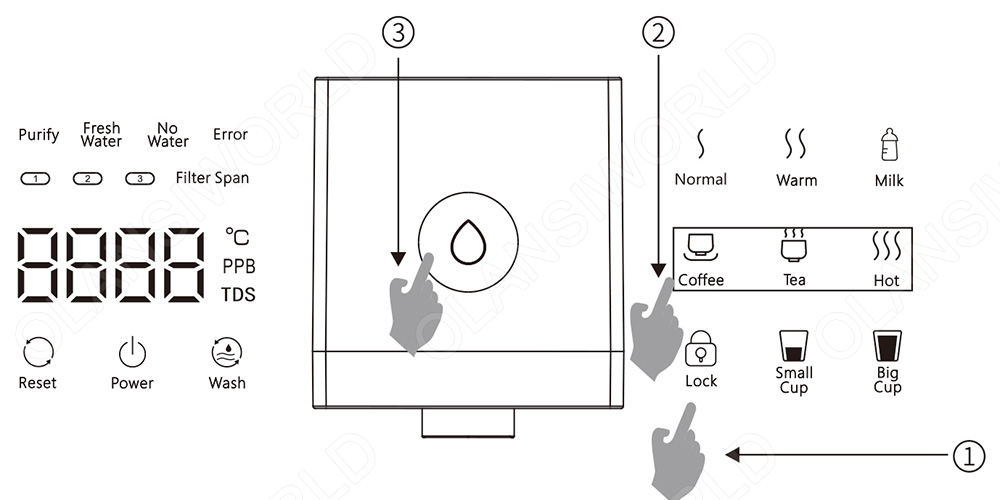
The first time l used it, | found that there was only half a tank of water in the small water tank of the transparent window. Click the normal temperature water button and release the water for 10 seconds. When the water level of the transparent window rises, the water can be stopped. During the dispenser’s work in progress, you can press the cold water key for 5 seconds to turn off the cooling function. To press the cooling function for 5 seconds again, you can turn on the cooling function. (Applicable to dispenser with cooling function)

Replacement of filter element

Step 1: Turn off the power and take out the old filter element (① ②)
Step 2: Installation of new filter element (③ ④)
w19 replacement of filter element 1
Press the “Push” button pops to open the head cover of the machine automatically;
w19 replacement of filter element 2
Rotate the filter element counterclockwise and take it out upward;
w19 replacement of filter element 3
Assemble the new filter element and rotate it clockwise to tighten it;
w19 replacement of filter element 4

Press and hold “RESET” and then touch “RESET” to select the corresponding filter element.
Press and hold “RESET” for 3s to complete resetting.

Note: Original filter element must be used for replacement to ensure the safety of drinking water. For any abnormal situation during the replacement of filter element, please contact the customer service center in time.

Function of filter element

Filter element for short Type of filter element Function Recommended replacement period
PAC Folding PP cotton activated carbon rod composite filter Removal of impurities such as silt, rust, sand, suspended solid and blood worm; removal of residual chlorine and absorption of disagreeable tastes and odors. 6-12 months
RO Reverse osmosis filter element Filter precision of 0.0001 μm, removal of incrustation and heavy metal 12-24 months
CF Rear composite carbon rod Further increase the taste 6-12 months
More Posts

Table of Contents

请在浏览器中启用JavaScript来完成此表单。
OLANSI
OLANSI HEALTHCARE CO.,LTD
WhatsApp
邮箱

Need Help?

I’m Here To Assist You

Something isn’t Clear?


Feel free to contact me, and I will be more than happy to answer all of your questions.

WATER & Air Purifier Market Size, Share, Analysis, Forecast
Price Value $4000+

Enter you email below, so we can send you this valuable report.