olansi logo blue 4

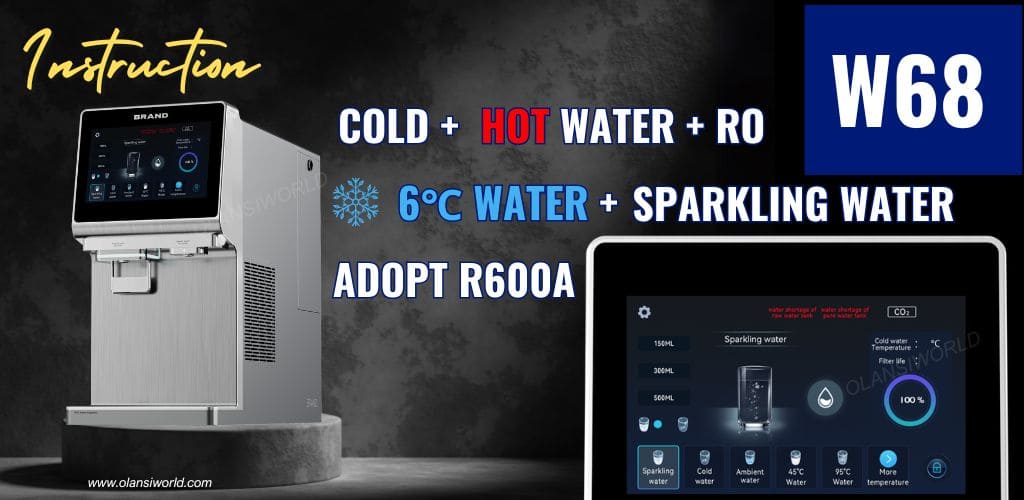
W68 Sparkling Water Dispenser Product Instruction

w68 olansi sparkling water dispenser

⚠ Warnings
1. Warning: There are no obstacles around the equipment or in the embedded structure, and ventilation should be maintained.
2. Warning: Do not use mechanical equipment or other methods to accelerate the defrosting process except as recommended by the manufacturer.
3. Warning: Do not damage the refrigeration circuit.
4. Warning: Electrical appliances must not be used in the food storage room of utensils, except for the types recommended by the manufacturer.
5. Do not store explosives, such as combustion-supporting sprays,In in appliances.
6. This appliance is used for household and similar purposes. If the symbol ISO 7000-1701 (2004-01) is used, its meaning should be explained.
8. Warning: Only connect to drinking water sources.

Remarks

▶ 1. After unpacking, the machine must be left to stand for at least 24 hours before being turned on for use.
▶ 2. This machine is equipped with a mandatory water change function. After the water change function light is on, the remaining water in the water box must be poured out and fresh water added (it is strictly prohibited to continuously add water directly into the water box).
▶ 3. It is strictly prohibited to move the machine arbitrarily. Before moving the machine, the water in the water tank must be drained before moving.
▶ 4. It is strictly prohibited to rinse the machine body with water.
▶ 5. It is strictly prohibited to use universal sockets together with other electrical appliances, and 10A sockets should be used.
▶ 6. It is strictly prohibited to place the drip tray in the air. The water collection box should be placed on the countertop.
▶ 7. It is strictly prohibited to add turbid tap water, ice, and other mixed liquids such as milk, fruit juice, etc., to the water tank.
▶ 8. It is strictly prohibited to insert the water outlet into the cup mouth when receiving water in order to avoid danger caused by boiling water blocking the water outlet.
▶ 9. This water purifier is suitable for children aged 8 and above who have decreased physical, sensory, or mental abilities or lack of menstrual function. People who have experience and knowledge can use it as long as they receive supervision or provide guidance and understand the hazards involved. Children are not allowed to clean without supervision and user maintenance.
▶ 10. If the power cord is damaged, in order to avoid danger, it must be handled by the manufacturer, their maintenance department, or a similar department. Professional personnel replacement. When the inlet water temperature or ambient temperature is below 5°C or above 38°C, please stop using it.
▶ 11. After using water at a higher temperature, immediately use water at a lower temperature. The temperature of the newly produced water may be higher. Please prevent burns.
▶ 12. When the raw water does not meet the municipal tap water standards (with high sediment content and excessive TDS), the lifespan of the filter element will be shortened.
▶ 13. To avoid danger, please place the water purifier on a flat surface.
▶ 14. Voltage range: 220V~240V ± 10%.
▶ 15. Before leaving the factory, the entire machine undergoes a full water inspection. It is normal for some residual water to be present inside the machine.
▶ 16. This product uses environmentally friendly refrigerant R600a. Please note that the refrigerant has a smell.
▶ 17. The ice water storage tank of this product is made of polyurethane foam material for thermal insulation. Please do not puncture or burn this product.
▶ 18. This product should be placed in a room without a source of ignition.
For example: open flames, ignited gas appliances, and opening. When repairing the electric heater, please contact an authorized service center. The repair must be carried out strictly. Please follow the operating manual provided by the manufacturer and prohibit maintenance by nonprofessionals.”
▶ 19. When repairing or scrapping, the refrigerant in the system needs to be removed.

Product parameters (W68)

Product nameReverse osmosis purification
machine
Product modelW68W68
Rated voltage110V220V-240V~
Rated frequency60Hz50Hz
Rated power1600W2400W
Rated heating power1500W2270W
Rated cooling power110W120W
Water heating capacity16L/h(≥90℃)18L/h(≥90℃)
Water cooling capacity3L/h(≤10℃)3L/h(≤10℃)
Working pressure0.4-0.6MPa0.4-0.6MPa
Applicable water sourceCity waterCity water
Applicable water temperature5-38℃5-38℃
Water tank capacity5L5L
Net weight20 kg20 kg
Dimensions510x220x453mm510x220x453mm

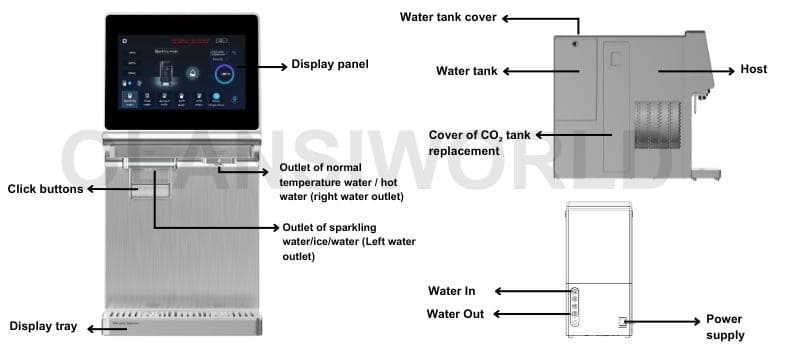
Schematic diagram of products

w68 olansi schematic diagram of products

For compression equipment using combustible refrigerants, the manual should include information on how to install the equipment:

1schematic diagram of products 1
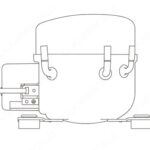
Direction 1: Forward
1schematic diagram of products 2
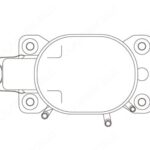
Direction 2: Three pipes facing upwards
1schematic diagram of products 3
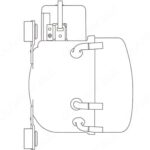
Direction 3: Terminal block facing upwards

◇ When designing a refrigeration system, full consideration should be given to the return oil of the system.
◇ Damaged compressors are not allowed to be used.
◇ After the compressor is installed on the box, it must always be kept vertical during transportation, Direction One as shown in the figure below. Priority should be given to “direction one” during loading and unloading, and in case of special circumstances, it must be turned to the side. When reversing, it is recommended to use “direction two” first, followed by “direction three.” Any adverse conditions caused by handling in other directions should not be related to the compressor itself, and our company will not assume any related responsibility.

Installation instructions
◇ System vacuum degree (compressor): 0.025
◇ MpaNon-condensable gases are limited to 1%.
◇ Maximum connector opening time: 10 minutes
◇ The compressor cannot withstand high voltage or start or operate under vacuum conditions and cannot be used for system vacuum pumping.
◇ The inclination between the compressor and the horizontal state during operation shall not exceed 5°.
◇ Using non-specified types of refrigeration oil: prohibited
◇ Compressor return liquid: not allowed
◇ The inventory period of the compressor after leaving the factory should not exceed 6 months.
◇ If it exceeds 6 months, please check if the dry air in the compressor is sufficient and supplement it if necessary.

Product function introduction

6product function introduction 1
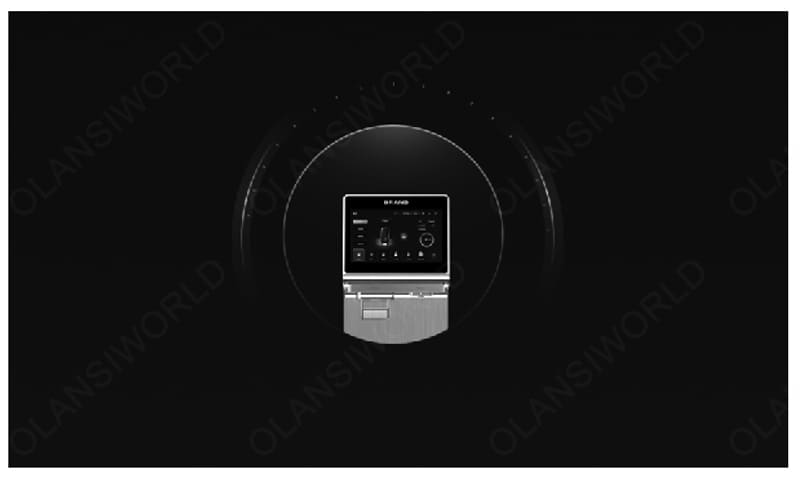
W68 Machine operation panel

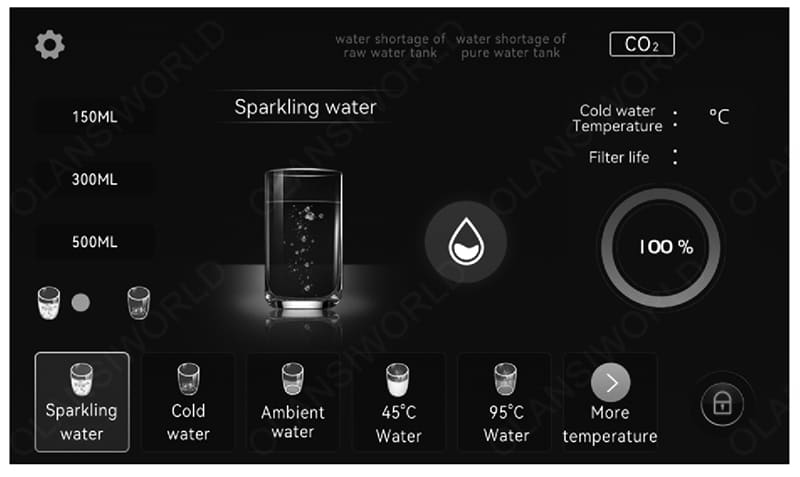
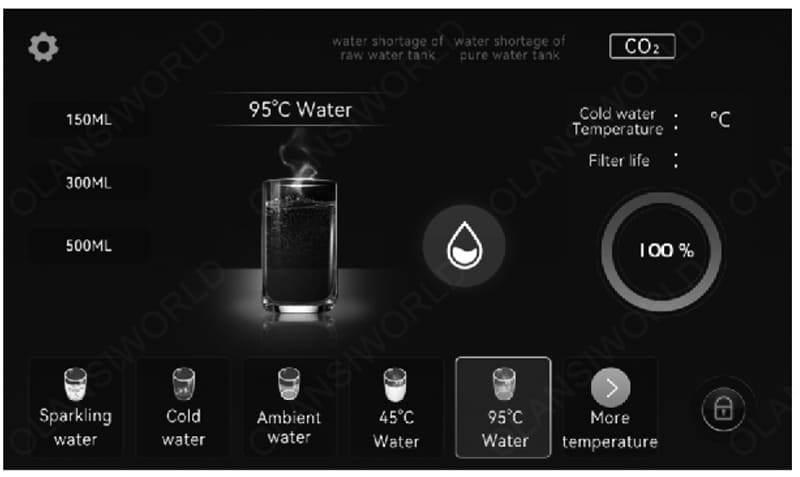
Insert the plug, switch on the power, the buzzer will sound “Ding,” and the display panel will light up after initialization is complete. The machine will enter sleeping mode. The display panel will light off if there is no operation in 5 minutes. Touch the main screen to light up the display panel.

6product function introduction 2
W68

Notes:
Operated under standby mode on the main screen: (The buzzer will sound “Ding” when pressing the functional button each time. When switched on, the power each time, the right side water outlet will always flow out normal temperature water in 5 seconds the first time.

6product function introduction 1
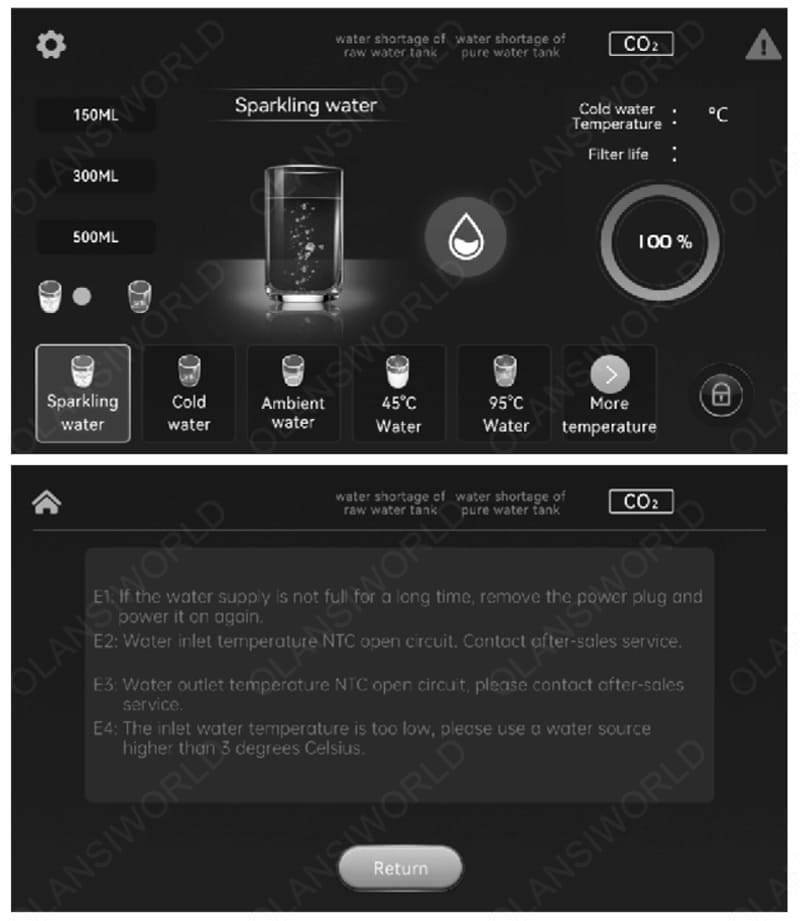
Sparkling water: Press “Sparkling water”; it will jump to the below screen page. Choose the cup 150ml/300ml/500ml, press “💧” or use cup touch when finished setting. The screen will jump to the outlet page, and the left side water outlet will flow out. It will jump back to the below screen page when the water outlet.
6product function introduction 3
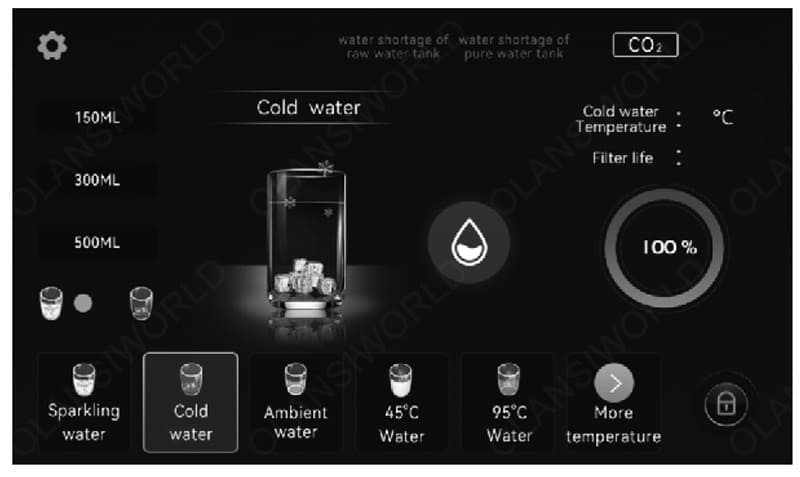
Cold water: Press “Cold water,” the blue LED light will light up, it will jump to the below screen page, choose the cup 150ml/300ml/500ml, press “💧” or use cup touch when finished setting. The screen will jump to the outlet page; the left side water outlet will flow out. It will jump back to the below screen page when finished with the water outlet.
6product function introduction 4
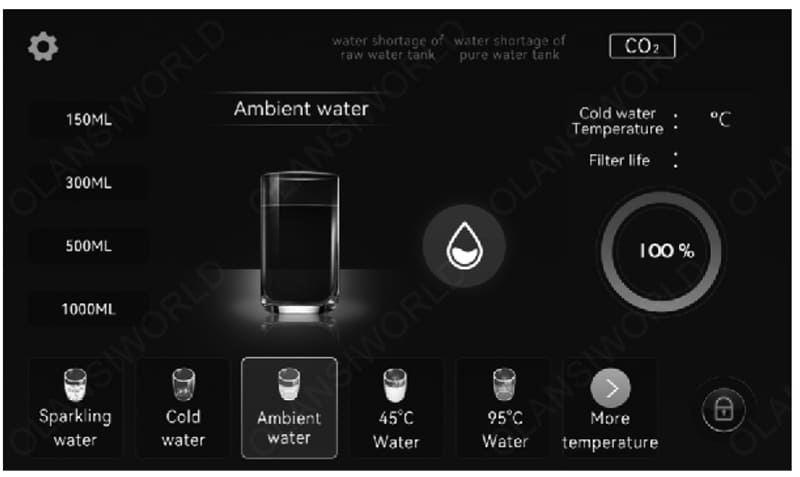
Ambient water: Press “Ambient water,” the white LED light will light up, and it will jump to the below screen page. Choose the cup: 150 ml/300 ml/500 ml. Press “💧” when finished setting. The screen will jump to the outlet page; the right water outlet will flow out. It will jump back to the below screen page when finished with the water outlet.
6product function introduction 5
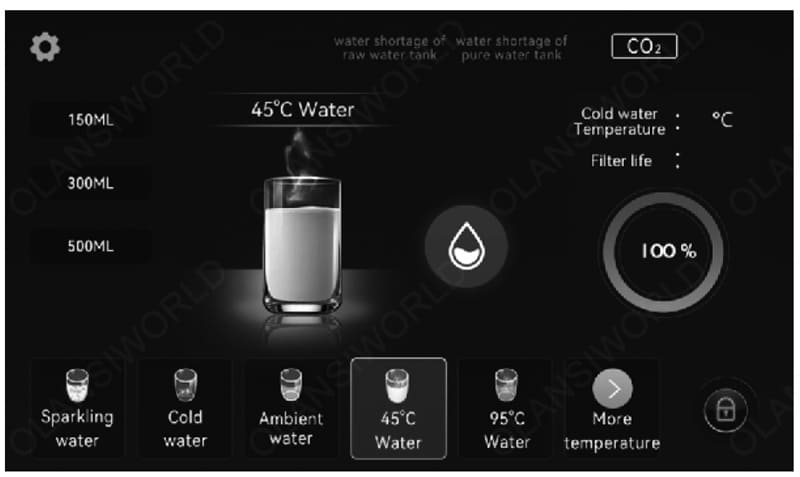
45℃ water: Press “45℃ water,” the yellow LED light will light up, and it will jump to the below screen page; choose the cup 150 ml/300 ml/500 ml. Press 💧 when finished setting. The screen will jump to the outlet page; the right side water outlet will flow out. It will jump back to the below screen page when finished with the water outlet.
6product function introduction 6
95℃ water: Press “95℃ water,” the red LED light will light up, and it will jump to the below screen page; choose the cup 150 ml/300 ml/500 ml. Press “💧” when finished setting. The screen will jump to the outlet page; the right water outlet will flow out. It will jump back to the below screen page when finished with the water outlet. Notes: long press the button of 95°C water for 5 seconds as shown. The screen will display the buttons of “+” and “-” to adjust the water temperature of hot water.
6product function introduction 6 1
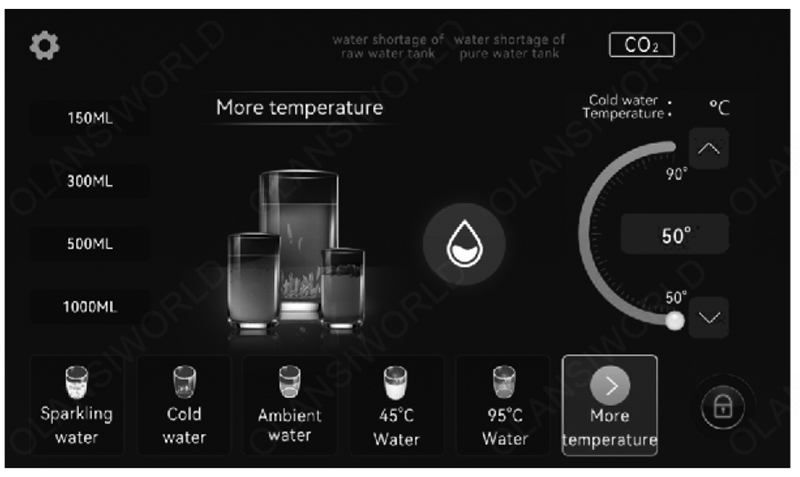
More temperature: Press “More temperature” and choose the cup 150 ml/300 ml/500 ml/1000 ml. The default temperature in this mode is 50 ℃, and the desired water temperature can be adjusted by pressing the up/down arrows (50 ℃/55 ℃/60 ℃/65 ℃/70 ℃/75 ℃/80 ℃/85 ℃/90 ℃). Press “💧” when finished setting; the right side water outlet will flow out. It will jump back to the below screen page when finished with the water outlet.
6product function introduction 13
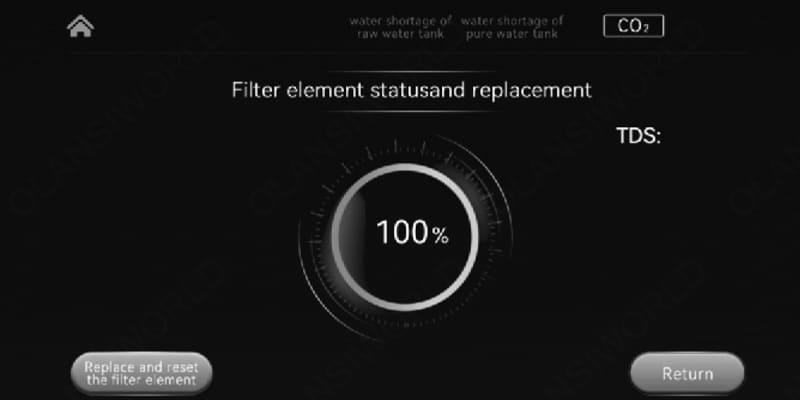
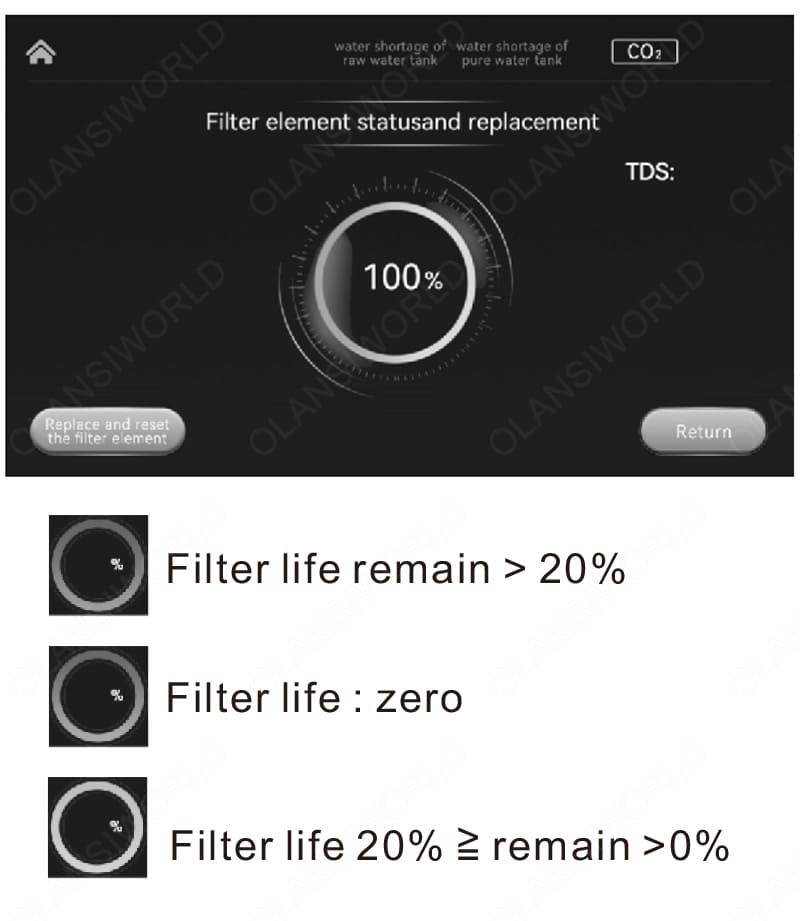
Filter status: It will remind the replacement of the filter when its life expires and jump to the reset screen page. Filter life remains > 20%; filter life 20% ≧ remain > 0%; filter life: zero
6product function introduction 12
More temperature: Press “More temperature” and choose the cup 150 ml/300 ml/500 ml/1000 ml. The default temperature in this mode is 50 ℃, and the desired water temperature can be adjusted by pressing the up/down arrows (50 ℃/55 ℃/60 ℃/65 ℃/70 ℃/75 ℃/80 ℃/85 ℃/90 ℃). Press “💧” when finished setting; the right side water outlet will flow out. It will jump back to the below screen page when finished with the water outlet.
6product function introduction 8
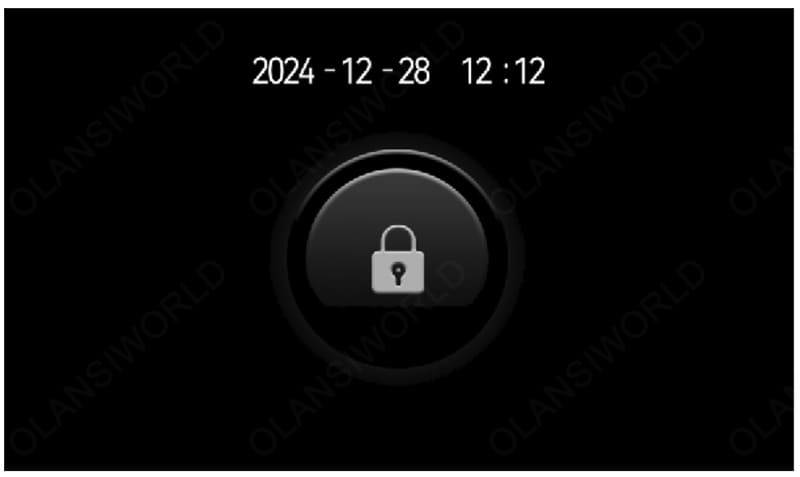
Lock: Press Lock one time ” to lock and press and hold it for five seconds. “Lock”on the lock interface to unlock it.
6product function introduction 9
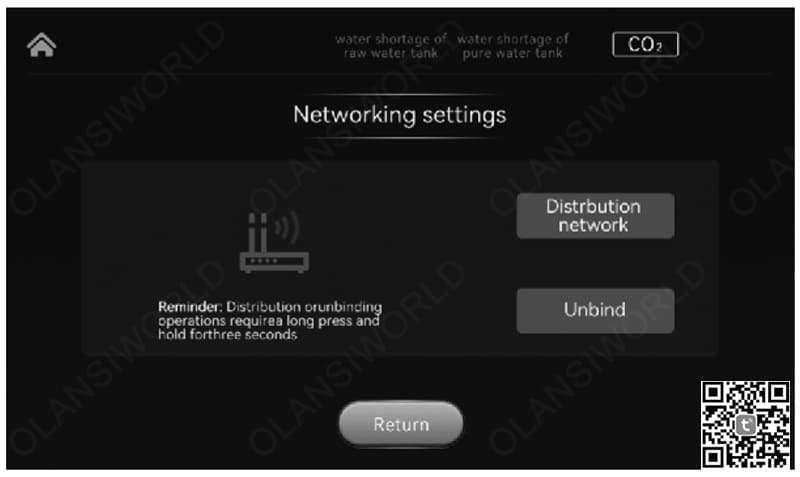
WiFi Network Setting: Click Reset the Network by mobile app; the screen page will have instructions if connected successfully. If it is already connected with the network, while pressing reset, Wi-Fi will unbind and go into resetting network status.
6product function introduction 8
Lock: Press Lock one time ” to lock and press and hold it for five seconds. “Lock”on the lock interface to unlock it.
6product function introduction 9 1
WiFi Network Setting: Click Reset the Network by mobile app; the screen page will have instructions if connected successfully. If it is already connected with the network, while pressing reset, Wi-Fi will unbind and go into resetting network status. 1. Scan and download: Download the “Smart Life” app ; 2. Register/Login: Sign in to the app after registering (applicable to Android and iOS systems)
6product function introduction 10
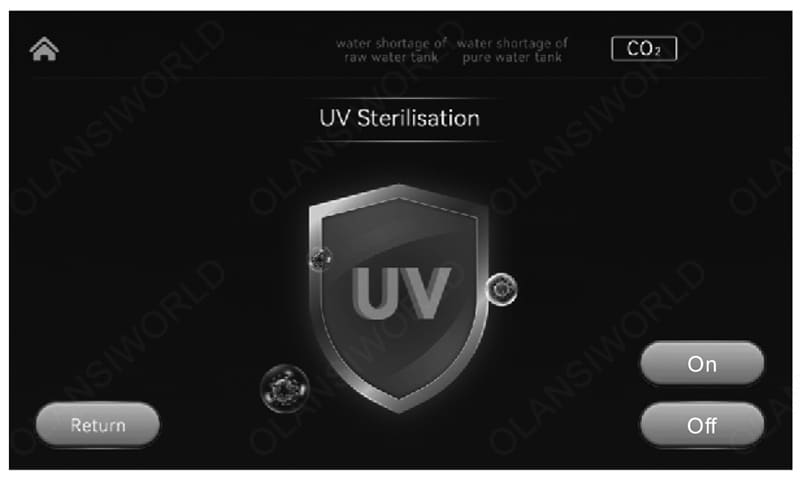
UV sterilization: Press “System setting,” press “UV sterilization,” and it could start UV sterilization of the machine or shut down UV sterilization of the machine.
9product function introduction 1 11
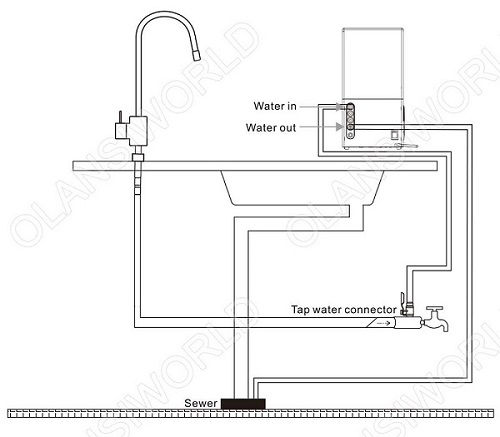
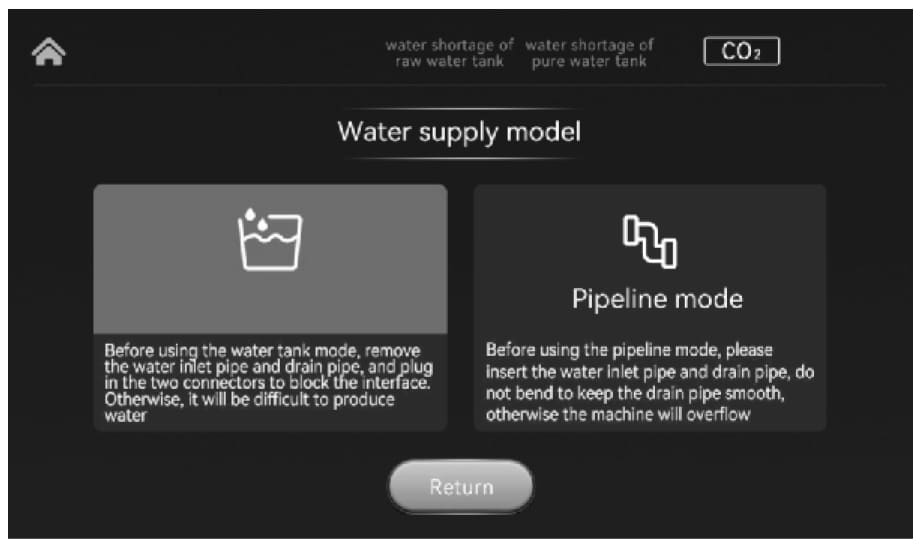
Pipeline mode switching: The default setting is with the original water tank mode. If you need to switch to pipeline mode, press this button to start; the machine will remember this setting from now on. Under pipeline mode, it must make sure to plug in with the input water pipe and wasted water pipe. (Please refer to the water pipe installation drawing for operation.) Under pipeline mode, turn off the faucet of tap water before starting to press the drain button. (Notes: Left and right side water outlets under the display panel will drain together.) If you need to switch back to the original water tank mode in the pipeline mode, you need to turn off the pipeline mode in the system settings on the screen, pull out the water inlet line and waste water line on the back at the same time, and insert the plug back into the water inlet hole and waste water hole, respectively, before the original water tank mode can be used normally.
IconFunction description
9function description 1Back to Home screen
water shortage of
pure water tank
The red light indicates that the pure tank is short of water
water shortage of
raw water tank
The red light indicates a shortage of water in the original tank
9function description 2Indicates that the UV sterilization function is enabled.
9function description 3The white light means there is enough carbon dioxide gas, and the red light means there is no carbon dioxide gas or no gas cylinder is installed.
9function description 4The red light indicates that carbon dioxide gas is fused into sparkling water in pure water; please wait 1-2 minutes to use it (the machine default ice water ≤10°C will make sparkling water).
9function description 5The filter life reminder light is divided into white, yellow, and red lights. When 20% < filter life ≤ 100%, the filter indicator will show white; 0 < filter life ≤ 20%, and the filter indicator light shows yellow. When the filter life is equal to 0, the filter indicator shows red.

Attention:
◆  The cooling setting must be enabled for the sparkling water function. If the cooling function is not enabled, the bubble water function cannot be used.
◆  Bubble water contains carbon dioxide, the outlet pressure is large, the discharge flow is not very accurate, and there is a small amount of jet when the outlet is produced. This is a feature of the function; this is a normal phenomenon.
◆  When the bubble water does not come out, please check whether the carbon dioxide
The cylinder has been used up in advance, such as after the gas is used up. Replace the new CO₂ cylinder assembly.
◆  The bubble water function product will have slight vibration and noise when it comes out of the water, which is a normal phenomenon, because the pressure of the bubble tank is large; the pump needs to pump the net water into the bubble tank.

Warm reminder:
● Each person’s taste and concentration requirements for sparkling water are different, and the concentration needs to be adjusted according to personal tastes and preferences. If you find the taste of sparkling water too strong, you can try adding some fruit or juice to the sparkling water to increase the texture and taste. For example, lemons, strawberries, blueberries, etc., are good choices.
● If you feel that the taste of sparkling water is too strong, you can try to reduce the pressure of sparkling water or add more pure water to dilute it. In addition, you can also add some moderate sweetener or sugar to
balance the taste. For example: honey, sugar, maple syrup, etc.
● The first use of bubble water carbon dioxide gas needs to be thoroughly dissolved into the cold tank inside; all the water needs to wait for ten minutes, which is the characteristic of bubble water.

6product function introduction 11

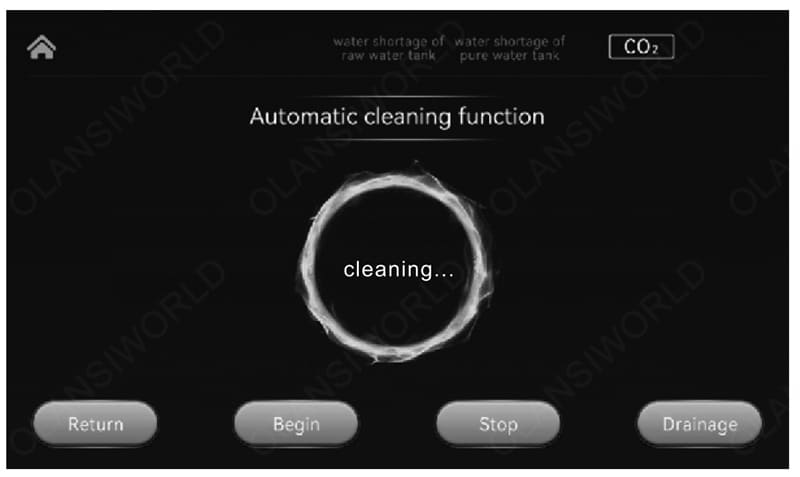
Operated with “self-cleaning” when first used or after replacement of the filter. Press “System setting” on the main screen, and press the function “Self-cleaning” into the automatic cleaning mode.
1. Press “Drain” mode to clean out all the water in the tank; under drain mode, two outlets will flow out water together. Please place water containers under the outlets.
2. After finishing the drains, press “Start” into “Self-cleaning” mode. After finishing the self-cleaning, the two outlets will stop flowing out water.
3. After finishing self-cleaning mode, please fill the water tank. (Notes: If you need self-cleaning, please repeat STEP 2.)
4. After finishing the above steps, please place the CO tank in the designated position to enter normal use status.

Notes: The CO2 tank cannot be placed in a designated position before cleaning. It must be placed in the machine after finishing cleaning.

Notes:
1. The buzzer will sound “Ding” when the operation is valid for pressing the button each time.
2. The machine will clean for 5 seconds when starting operation or each time filling with water in the tank. The water icon will light up in the display panel.

Waterway Installation Diagram​

w61 waterway installation diagram 6 2
w61 waterway installation diagram 1
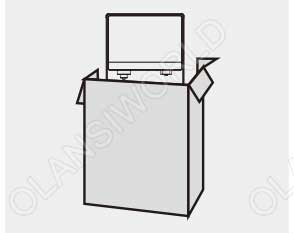
1.After taking the product out of the packing box, place it in a flat place, such as the desktop or cabinet countertop.
w61 waterway installation diagram 2
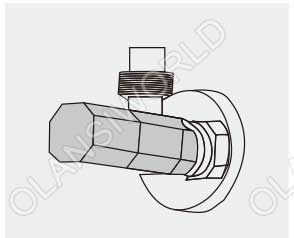
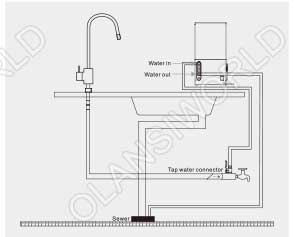
2.Take out the inlet ball valve, install it on the angle valve connect PE water pipe and install it on the inlet at the rear of the host. (Note: PE pipe should be inserted tightly)
w61 waterway installation diagram 3
3. Connect the pipeline according to the stage installation schematic diagram (as shown in the right, see the stage waterway instalation diagram for big picture)
w61 waterway installation diagram 4
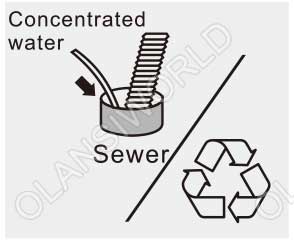
4. Concentrated water can be discharged directly into the sewer or recycled.

Steps for replacement of sparkling tank

When the machine display shows no CO2, it means that it needs to replace the gas tank.

1 w61 steps for replacement of bubble tank
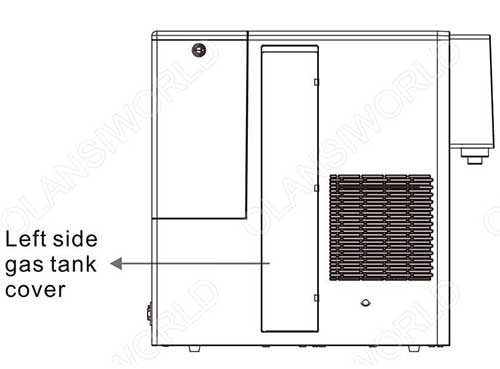
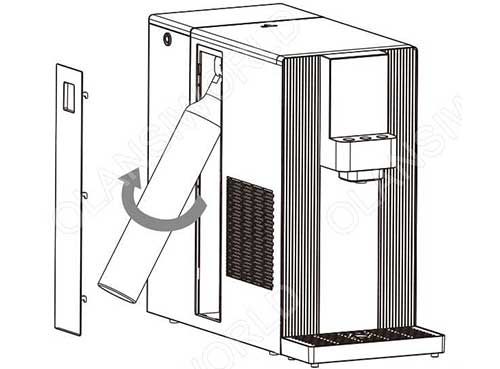
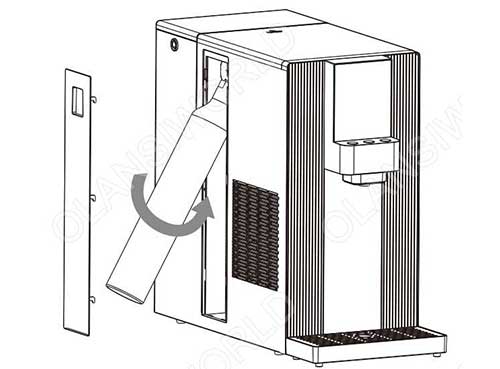
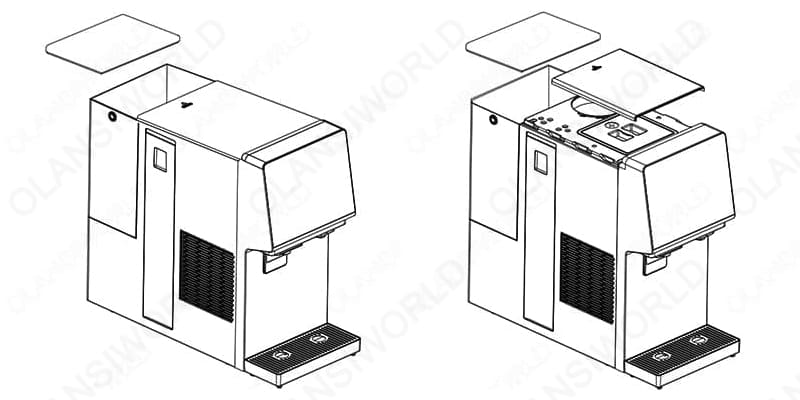
Step 1: Turn off the power supply, open the gas tank cover, hold the notch of the cover by your finger and pull it up to open the tank cover.
2 w61 steps for replacement of bubble tank
Step 2: When open the cover, hold the bottom of the bottle to pull outward, rotate the bottle by counterclockwise.
3 w61 steps for replacement of bubble tank
Step 3: Remove the sealing of new gas bottle, place the spout to the machine's connector of relief valve. The connector can be pulled up to align with the bottle's spout, rotating the bottle with clockwise and fix. Close the tank cover.
4 w61 steps for replacement of bubble tank
Step 4: After replacement of gas bottle, white writing of CO₂ will be shown in display panel again, means that the gas bottle has been fixed.

Replacement of filter element​

12replacement of filter element 1 1
Step 1: Turn off the power, open the water tank cover, push backward the top lid of the machine.
12replacement of filter element 3
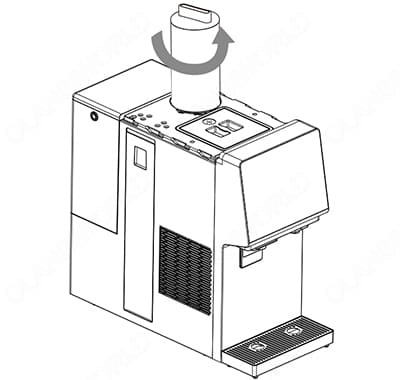
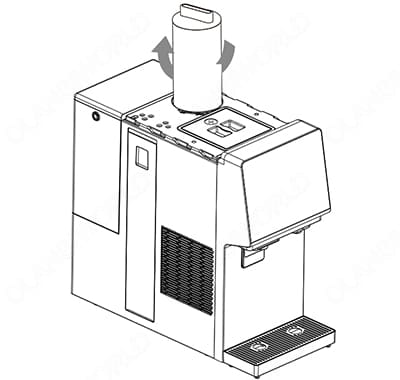
Step 2: Rotate the filter counterclockwise and take it out upward.
12replacement of filter element 4
Step 3: Assemble the new filter and rotate it clockwise to tighten
12replacement of filter element 5 1
Step 4: Press the button of the machine status into the replacement of the filter, and press reset. After finishing the filter replacement, it suggests operating with the self-cleaning function to clean the new filter.

Note: The original filter element must be used for replacement to ensure the safety of drinking water. For any abnormal situation during the replacement of the filter element, please contact the customer service center in time.

Fault elimination

If your machine fails, please refer to the help information in the following table first. If the problem cannot be solved, please contact the local maintenance department.

FaultReason
The machine cannot produce water1. Check whether the raw water tank has water
2. Check whether the filter element is blocked due to too much dirt.
Water flow is smallerCheck whether the filter element is too dirty or used beyond the service life.
Water seepage at the screw interface1. Check whether the parts on the machine have been dismantled without authorization
2. Check whether the parts at the seepage place are screwed tightly, staggered in teeth, or slide
3. Check whether the silicone seal ring at the seepage place is aged or damaged
Electricity leakage and induced electricity of machine bodyThe machine is grounded poorly
Machine does not heat1. Is your dispenser connected to the power supply
2. The temperature-controlled protector on the heating barrel is not reset.
Machine is not cooling1. Is the machine connected with the power supply
2. Is the cooling function turned off
The machine is not carbonating.1. Check the CO₂ icon to see if it changes to red or not to judge if there is no gas in the CO₂ tank.
2. Check the water lack icon to judge if there is a lack of water in the carbonating tank
3. Check the indication of cold water temperature to see if it is below 10 degrees.

· If the power cord is damaged, it must be replaced by a professional from the manufacturer, maintenance department, or similar department in order to avoid danger. Avoid pinching, folding, knotting, or damaging the power cord.
· It must be installed by professionals. Disassembling parts on the product yourself may damage the product or cause electric shock. Moving and handling by yourself may cause improper operation and damage to the machine.

Function of filter element

Filter element for shortType of filter elementFunctionRecommended replacement period
RO4 in 1 RO Reverse Osmosis Composite Filter ElementRemoval of impurities such as silt, rust, sand, suspended solids, and blood worm; Removal of residual chlorine and germs, heavy metals, and absorption of disagreeable tastes and odors; prevent the growth of germs and improve the tastes.24 months

W68 Sparkling Water Dispenser

W68 Sparkling Water Dispenser

OLANSI Instruction

OLANSI
OLANSI HEALTHCARE CO.,LTD
WhatsApp
邮箱

Need Help?

I’m Here To Assist You

Something isn’t Clear?


Feel free to contact me, and I will be more than happy to answer all of your questions.

WATER & Air Purifier Market Size, Share, Analysis, Forecast
Price Value $4000+

Enter you email below, so we can send you this valuable report.