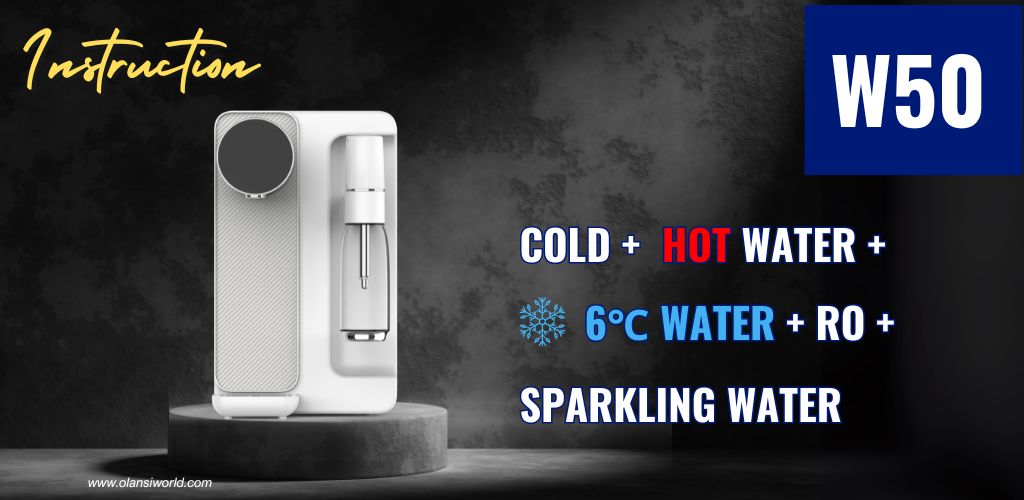
W50 Water Dispenser with Ice Making — Product Instruction
1.1 Before Use
Dear customers, thank you for choosing the Reverse Osmosis Water Purifier and Drinking Machine produced by our company.
To ensure correct use and maintenance of this product, please read this instruction manual carefully before installing and operating the machine.
1.2 Product parameters
| Specification Item | Parameter (110V~) | Parameter (230V~) |
|---|---|---|
| Product Name | Reverse Osmosis Sparkling Water Dispenser | Reverse Osmosis Sparkling Water Dispenser |
| Product Model | W50 | W50 |
| Rated Voltage | 110V~ | 230V~ |
| Rated Frequency | 60Hz | 50Hz |
| Rated Power | 1500W | 2200W |
| Rated Heating Power | 1400W | 2100W |
| Rated Cooling Power (Model with Refrigeration) | 70W | 70W |
| Water Heating Capacity (≥90°C) | 16L/h | 18L/h |
| Water Cooling Capacity (≤15°C) | 0.5L/h | 0.5L/h |
| Water Production Flow | 15.6L/h | 15.6L/h |
| Working Pressure | 0.4~0.6MPa | 0.4~0.6MPa |
| Applicable Water Source | City Water | City Water |
| Applicable Water Temperature | 5–38°C | 5–38°C |
| Water Tank Capacity | 4.8L | 4.8L |
| Net Weight | 8.7 kg | 8.7 kg |
| Dimensions | 420×231×376mm | 420×231×376mm |
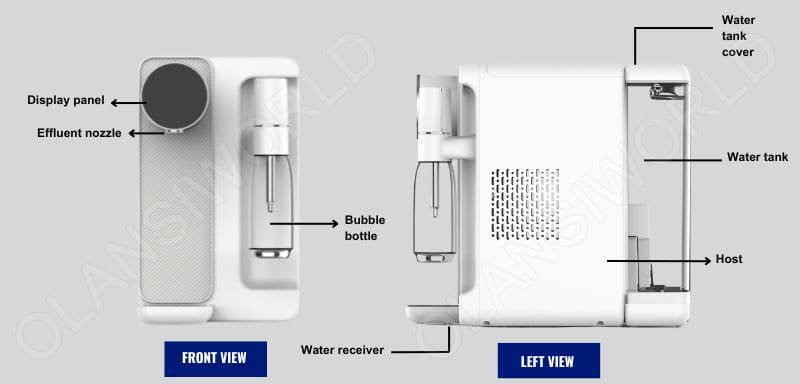
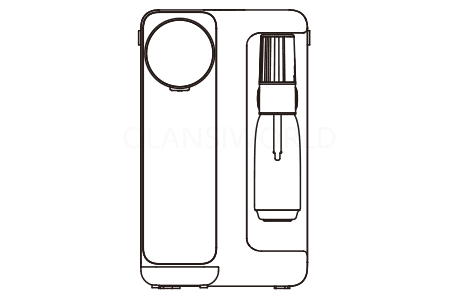
1.3 Schematic diagram of products
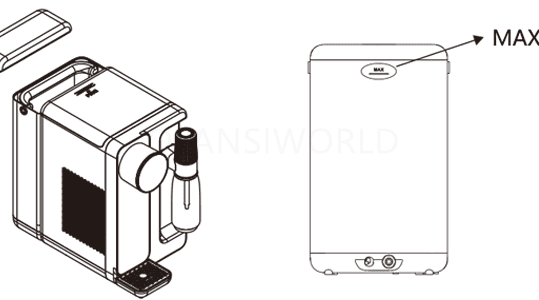
2.1 Packaging Removal
Open the complete packaging, take out the built-in accessories and documents, lift the machine out of the box, remove the packaging bag, and keep the outer packaging properly for future transportation and storage.
2.2 Packing List
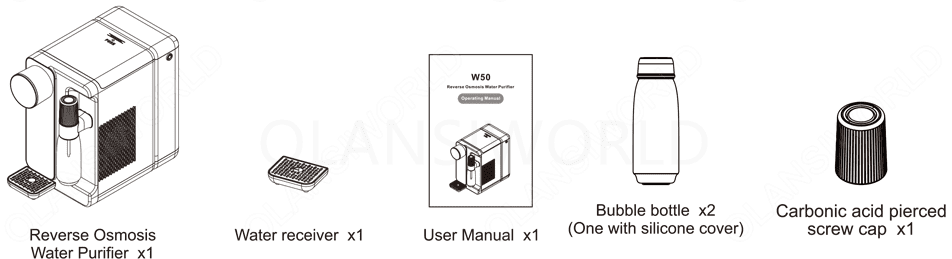
2.3 Read the Instruction Manual
Before installing and using the machine, please read the instruction manual carefully
2.4 Precautions
1. It is strictly forbidden to move the machine at will. Before moving the machine, please refer to 4.3 Moving Procedures to operate, and empty the water in the water tank before moving.
2. It is strictly forbidden to rinse the machine body with water.
3. It is strictly forbidden to use any universal socket together with other electrical appliances, and a special socket not less than 10A shall be used.
4. It is strictly forbidden to make the water receiver suspend in midair, and the water receiver shall be placed on a stable table.
5. It is strictly forbidden to add turbid tap water, ice cubes and other mixed liquids such as milk, juice, etc. to the water tank.
6. When receiving water, it is strictly forbidden to extend the water outlet into the mouth of the cup, so as to avoid the danger caused by blocking the water outlet with boiling water.
7. This drink purifier can be used by children aged 8 years and above, persons with reduced physical, sensory or mental abilities or lack of experience and knowledge, as long as they are under supervision or guidance on the safe use of the drink purifier and understand the risks involved. Children shall not perform cleaning and user maintenance without supervision.
8. If the power cord is damaged, it must be replaced by the manufacturer, authorized service agents or relevant professionals to avoid danger.
9. When the inlet water temperature or ambient temperature is lower than 5 °C or higher than 38 °C, please stop using the appliance.
10. After taking high-temperature water, immediately take low-temperature water. The temperature of the water that just comes out may be higher; please prevent burns.
11. When the raw water does not meet the municipal tap water standard (the sediment content in the water is large and the TDS exceeds the standard), the service life of the filter element will be shortened.
12. In order to avoid danger, please place the water purifier on a flat table. (The inclination angle of the table surface shall not exceed 10°)
13. When using the bubble water function, operate when the bottle is filled with cold water to the designated filling line, and do not operate when it is empty.
14. Do not fill with too much water.
15. Under no circumstances should you attempt to make hot water bubbly, or continue inflating to make bubbles when the water exceeds the bottle’s maximum water level, otherwise the bottle may break.
16. Operating voltage range: 230V~+10%.
17. The machine is fully inspected for water passage before leaving the factory, and it is normal for some residual water to remain inside.
18. After adding non-machine-made cold water or ice-water mixture to the bubble water bottle, do not continue inflating to make bubbles, as this may cause accidents such as bottle rupture and damage to the air inlet blocking structure.
2.5 Operation Guideline
Step 1: Place the water purifier on a flat surface such as a desktop or cabinet countertop.
Step 2: Remove the water tank, fill the raw water tank with clean tap water, then reinstall the water tank onto the purifier and close the tank lid.
Step 3: Plug the power cord into an AC power supply (220V~50Hz) socket to power on the machine. Long press the Power button for 2 seconds to turn on the machine. The machine will start backwashing the filter element and automatically produce water. Please wait patiently for about 5 minutes.
Step 4: Rinse the filter element.
To ensure excellent water quality and taste, double-click the Reset Wash button to start manual rinsing. Place a water container (e.g., a bucket) under the water outlet to collect water until the Reset Wash indicator stops flashing, indicating that smart rinsing is complete.
Step 5: Unplug the machine, place a water container (e.g., a bucket) under the water outlet to drain the water from the cooling tank, then reinstall the plug. Pour out the residual concentrated water in the raw water tank, refill it with clean tap water, and reinstall the tank onto the machine.
Step 6: Power on the machine again to activate the ice water function. Place a water container under the water outlet and press the Cold button to exhaust air first. If water flows out of the outlet within 30 seconds, ice water activation is successful.
(Note: The machine operates normally during activation; do not power off. Abnormal air spray noise during this period is normal.)
Step 7: The installation and activation of the machine are now complete. You may use the machine freely and enjoy healthy, fresh, and high-quality water.
Notes:
1. The machine is equipped with an automatic water stop protection device. Water output will stop automatically if it runs continuously for more than 200 seconds.
2. When dispensing hot water, do not place your hand under the water outlet to avoid scalding.
3. To prevent dry burning, when dispensing hot water for the first time after power-on, first dispense room-temperature water for a period, then select hot water.
4. When water is flowing, pressing any water temperature button will immediately stop water output.
3.1 Preparation before Use
Make sure that the product has been installed and activated in accordance with the installation guidelines.
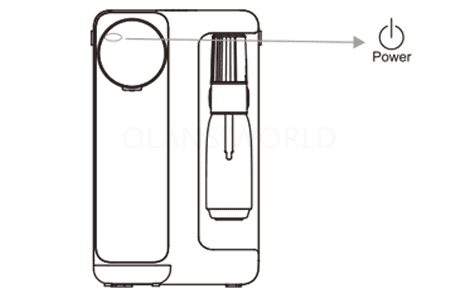
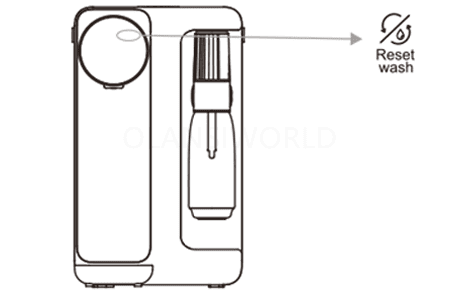
3.2 User Interface Introduction
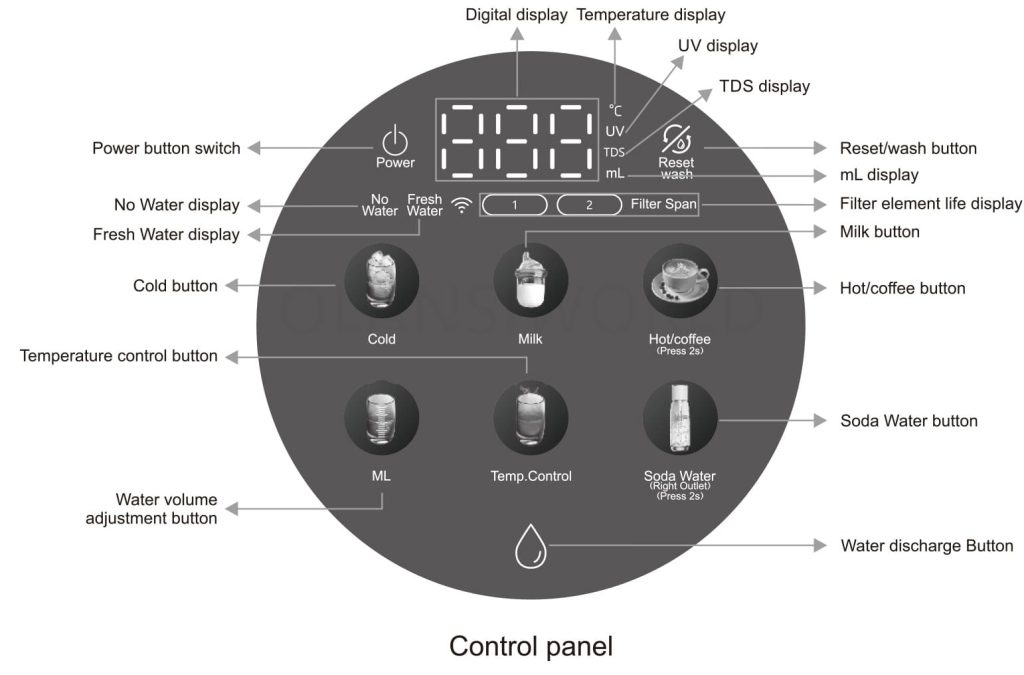
3.3 Functional Operation Guidelines
| Function | Operation | Description |
|---|---|---|
| Power on | Long press Power for 2 seconds | After connecting to the power supply, the buzzer will beep, and all indicators will light up for 2 seconds. At this time, only the Power indicator lights red; all other indicators are off. Long press Power for 2 seconds, and the machine will power on with the Power indicator lighting white. |
| Power off | Long press Power for 2 seconds | Only the Power indicator lights red; all other indicators are off. |
| Smart rinsing | Double-click Reset Wash | Double-click the Reset Wash button. The white indicator will flash, and filter element rinsing will start. |
| Take room-temperature water | Short press Water Discharge Button | The white light flashes. (If the water is not room-temperature, press Temp. Control to check the setting, then set to 25 °C and press Water Discharge Button again.) The default first water output is 500 mL, and it stops automatically. The machine remembers the last adjusted volume. |
| Adjust water temperature for discharge | Short press Temp. Control to set temperature, then short press Water Discharge Button | 1) Six temperature settings: 25 °C, 45 °C, 55 °C, 65 °C, 75 °C, 85 °C. 25 °C / 45 °C / 55 °C are memorized; 65 °C / 75 °C / 85 °C are not. Next press defaults to 25 °C. 2) Three-color indicator: - White: 25 °C, 45 °C, 55 °C, Milk - Red: Hot / Coffee, 65 °C, 75 °C, 85 °C - Blue: Cold, Soda Water |
| Adjust water volume for discharge | Short press ML, then short press Water Discharge Button | Before discharging water, press ML to cycle through 150 mL, 300 mL, 500 mL, 999 mL (max ~1 L). Then press Water Discharge Button to dispense water. All functions except Soda Water remember the set volume. |
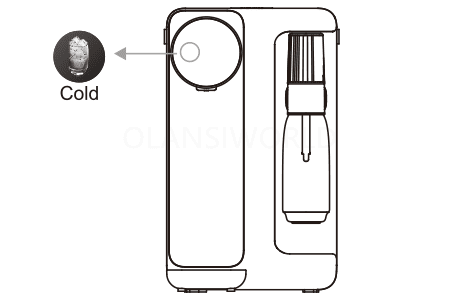
| Take ice water | Short press Cold, then short press Water Discharge Button | Short press Cold; the Cold indicator flashes. Press Water Discharge Button; its blue indicator flashes and ice water flows. Press again to stop. Default first output: 500 mL. The last adjusted volume is remembered. |
| Turn off ice making | Long press Cold for 5 seconds | If ice water is not used for a long time, long press Cold for 5 seconds to stop ice making. To resume, long press Cold for 5 seconds again. |
| Take water for milk preparation | Short press Milk, then short press Water Discharge Button | Short press Milk; its indicator flashes. Press Water Discharge Button; its white indicator flashes and water flows. Press again to stop. Default first output: 500 mL. The last adjusted volume is remembered. |
| Adjust milk preparation temperature | Short press Milk, then short press Temp. Control | With the Milk indicator flashing, short press Temp. Control to cycle through 40–65 °C. |
| Take Hot / Coffee water | Long press Hot/Coffee (Press 2s) for 2 seconds, then short press Water Discharge Button | Long press Hot/Coffee (Press 2s) for 2 seconds; the indicator flashes. Press Water Discharge Button; its red indicator flashes and water flows. Press again to stop. (Note: First discharge must run 25 °C water for 5 seconds.) Default first output: 500 mL. Last adjusted volume is remembered. |
| Adjust Hot / Coffee temperature | Long press Hot/Coffee (Press 2s) for 2 seconds, then short press Temp. Control | Long press Hot/Coffee (Press 2s) for 2 seconds, then short press Temp. Control to cycle through 80–95 °C. The set temperature is memorized. |
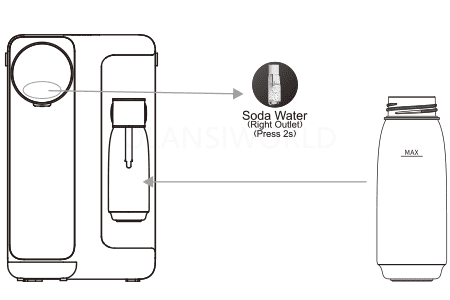
| Soda Water | Long press Soda Water (Right Outlet) (Press 2s) for 2 seconds, then short press Water Discharge Button | Long press Soda Water (Right Outlet) (Press 2s) for 2 seconds; the indicator flashes. Press Water Discharge Button to dispense about 220 mL of ice water for soda making. See 3.4 Bubble Water Operation. Warning: If interrupted and resumed, stop dispensing before water reaches the max line. If overfilled, pour out excess water before making soda. |
| Filter reset | Long press Reset Wash for 3 seconds | 1) Long press Reset Wash for 3 seconds to select a filter; the indicator flashes. Press to select Filter 1 or Filter 2. With Filter Span flashing, long press Reset Wash for 3 seconds to reset. 2) Filter Span ① = PAC filter; Filter Span ② = RO filter. Indicator colors: White = normal; Orange = 80% used; Red = expired. PAC life: 100 hours; RO life: 150 hours. Red stays on until reset. |
| No Water | Icon displayed | 1) When the purified water tank is low and the low-level switch is triggered, the No Water indicator stays on. All heating functions stop. Pressing a heating button triggers two beeps. (Note: Check and refill the raw water tank, then wait for water production.) 2) After refilling, normal water production resumes and the No Water indicator turns off. |
| Fresh Water | Red icon | 1) Raw water tank level below rated value; the red indicator flashes. Remove the tank, discard concentrated water, refill with fresh water, and reinstall. 2) If the tank is lifted while full, two beeps sound and the red indicator flashes. Reinstall the raw water tank. |
| White icon | Lights white when purified water TDS > 300. Machine works normally. For better taste, double-click Reset Wash to drain the purified water tank, discard concentrated water from the raw tank, refill, and reinstall. | |
| UV lamp | Icon displayed | If equipped, the UV indicator on the panel stays white when the machine is on. |
| TDS | Icon displayed | White indicator shown in standby mode. |
Other Instructions
1. After all operations and water dispensing are completed, the machine will exit the selection mode after 5 seconds of inactivity, and enter standby mode after 55 seconds. Standby mode means no button pressing, no water dispensing, and no interface operation.
2. The maximum continuous water dispensing time is 200 seconds; water output will stop automatically when the time limit is reached.Water cannot be dispensed when the purified water tank is at a low water level.After water replacement is finished, during the low water level switch detection process (the water replacement switch is off for 2 seconds and then closed again), the indicator will turn off. The machine will resume water production and rinsing and return to normal working status.
3.4 Guidelines for Making Bubble Water
Step 1: Take out the bubble water bottle, align it with the air spraying device and tighten it until fully sealed. Long press the Soda Water (Right Outlet) (Press 2s) button for 2 seconds; the indicator will flash. Press the Water Discharge Button; about 220 ml of ice water will flow from the soda water outlet. If the water reaches the maximum scale line and does not stop, press the bubble water icon on the display to manually stop water dispensing.
Precautions:
When making bubble water, do not manually add ice water or an ice-water mixture below 4 °C before screwing the bottle closed.
Do not add other mixtures such as seasoning powder, juice, pulp, etc., into the bottle.
Before using the bottle, clean it to ensure no foreign matter or residual water remains.
Do not insert 2 or more CO₂ cartridges continuously for a single batch of bubble water.
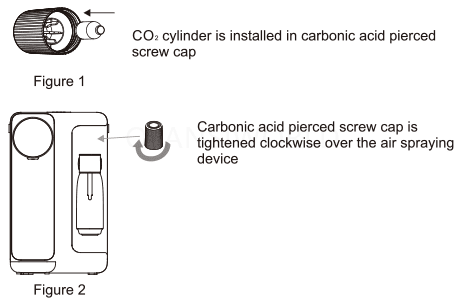
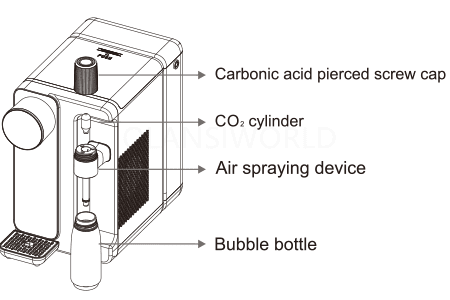
Step 2: Install the CO₂ cartridge into the carbonic acid piercing screw cap (Figure 1), then tighten the cap clockwise onto the air spraying device (Figure 2). You will see gas released into the bottle and hear a hissing sound; a small amount of excess CO₂ will be released through the safety relief valve of the air spraying device. This is normal during carbonation. The carbonation process takes at least 30 seconds to complete.
(Note: CO₂ cartridges are not included as standard accessories. To ensure proper fit and safe use, please purchase our company’s standard CO₂‑filled cartridges separately. For purchase inquiries, contact our customer service center promptly.)
CO₂ cartridge is installed into the carbonic acid piercing screw cap
Carbonic acid piercing screw cap is tightened clockwise onto the air spraying device
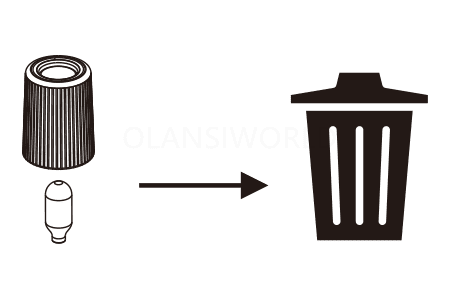
Step 3: After the carbonated water is successfully made, slowly unscrew the carbonic acid piercing screw cap and press the button on its top. The CO₂ cartridge will drop out automatically. Then slowly unscrew the bubble water bottle. The bubble water is now ready to enjoy.
(Note: After use, remove the CO₂ cartridge promptly to prevent it from reacting with air or condensate and causing rust, which may contaminate the machine.)
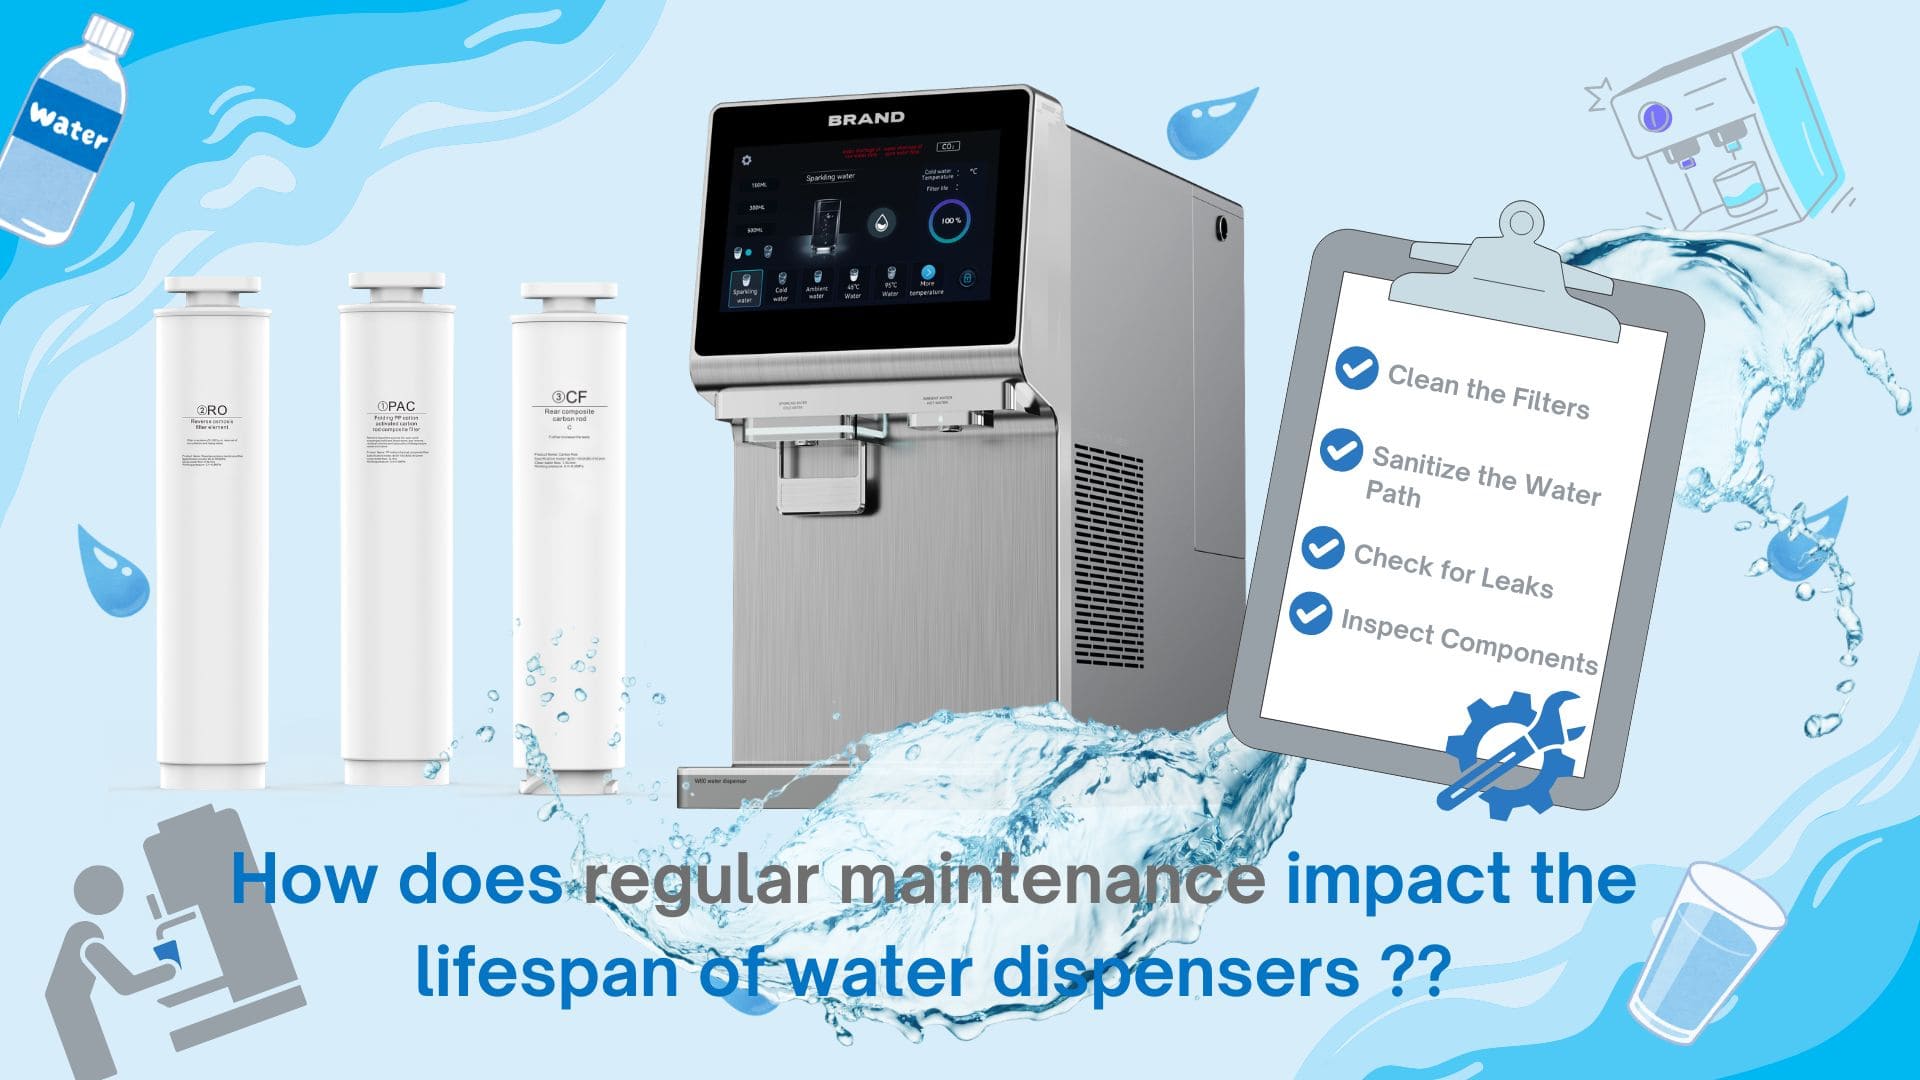
4.1 Regular Equipment Cleaning
To ensure your reverse osmosis water purifier operates properly, please carry out regular maintenance.
If the equipment has not been used for a long time, please perform a smart rinse before reuse (see 3.3 Functional Operation Guidelines for details).For better water taste, it is recommended to perform a smart rinse once a month.
4.2 Filter Element Replacement
The filter element does not need to be replaced when the machine is first installed and used.When the recommended service life of the filter element expires, please replace it with a new one.
| Filter Element (Short) | Type of Filter Element | Function | Recommended Replacement Period |
|---|---|---|---|
| PAC | Folded PP cotton + activated carbon composite filter | Removes impurities such as silt, rust, sand, suspended solids, and red worms; removes residual chlorine and absorbs unpleasant odors. | 6–12 months |
| ROC | Reverse osmosis filter element | Filtration precision: 0.0001 μm; removes scale and heavy metals. | 12–24 months |
4.3 Filter Element Replacement Steps
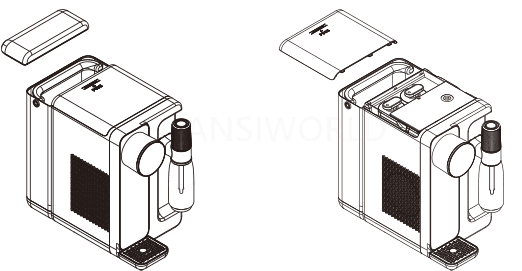
Step 1: Disconnect the power supply, open the water tank lid, and slide the machine top cover backward.
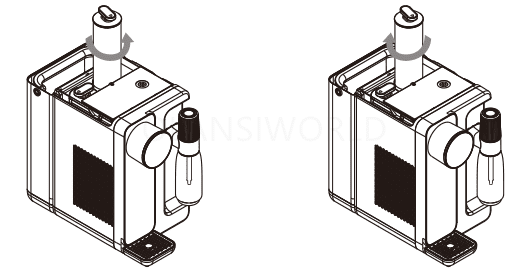
Step 2: Rotate the filter element counterclockwise and pull it upward to remove.
Step 3: Install the new filter element and rotate it clockwise to secure.
Step 4: Long press Reset Wash for 3 seconds, then press Reset Wash to select the corresponding filter element. Long press Reset Wash for 3 seconds to complete the reset.
Note:Only original filter elements must be used to ensure drinking water safety.If any abnormality occurs during filter replacement, please contact the customer service center immediately.
4.3 Moving the Machine
If you need to move the machine, please drain all water first to avoid water leakage and equipment damage during transportation.
1. Lift the raw water tank, pour out all water, and dry the tank.
2. Long press Reset Wash + Water Discharge Button; after 5 minutes, empty the water in the purified water tank.
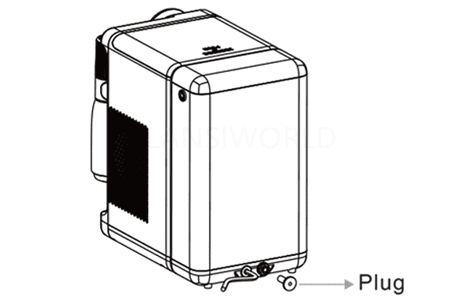
3. Unplug the cooling tank plug, empty the water in the cooling tank, then reinstall the plug securely.
5.1 Fault Resolution
If your machine malfunctions, please refer to the troubleshooting information in the table below first. If the problem persists, contact the local maintenance department.
| Fault | Possible Causes & Troubleshooting |
|---|---|
| The machine cannot produce water | 1. Check if there is water in the raw water tank 2. Check if the filter element is clogged due to excessive dirt accumulation |
| Water flow is low | Check if the filter element is excessively dirty or has exceeded its service life |
| Water tastes abnormal | Check if the filter element has not been replaced after exceeding its service life |
| Water seepage at threaded joints | 1. Check if any parts of the machine have been disassembled without authorization 2. Check if the parts at the seepage point are loose, cross-threaded, or stripped 3. Check if the silicone sealing ring at the seepage point is aged or damaged |
| Machine body leakage or induced electricity | 1. Poor grounding connection of the machine 2. Water leakage inside the machine |
| Machine does not heat | 1. Check if the dispenser is properly connected to the power supply 2. Check if the temperature control protector on the heating barrel needs to be reset |
| Machine does not cool | 1. Check if the dispenser is properly connected to the power supply 2. Check if the cooling function has been turned off |
| Water leakage during bubbling | 1. Excessive water added beyond the marked max water level line 2. The spray tube is not tightly secured |
| No bubbling or bubbling difficulty | 1. Reused CO₂ cylinder may have a hole at the puncture site after gas depletion 2. The spray tube is not tightly secured |
5.2 Fault Code Instructions
When a fault occurs, first record the fault code and then turn off the power supply before proceeding with troubleshooting.
| Fault Code | Fault Cause | Troubleshooting Method |
|---|---|---|
| Fault E1 | The water tank is not fully filled after 120 consecutive minutes of water purification | Check for water leakage or insufficient water supply to the tank |
| Fault E2 | Open circuit of the inlet water temperature NTC sensor | Contact after-sales service for professional repair |
| Fault E3 | Open circuit of the outlet water temperature NTC sensor | Contact after-sales service for professional repair |
| Fault E4 | Inlet water temperature is detected below 0–1°C | Use water with a temperature of 5°C or above |
| Fault E5 | Communication failure (accompanied by fault light on and display showing "E5") | Power off the machine and then restart it |
| Fault E6 | Hardware malfunction detected in the heating circuit board | Contact after-sales service for professional repair |
| Fault E7 | Over-temperature of heating components | The machine will automatically resume normal operation once the temperature cools down |
W90 Series's Details
W90 Related Videos
W90 Ice, Hot & Cold Water Dispenser
W90 Operation Overview
How to Use the W90

OLANSI
OLANSI HEALTHCARE CO.,LTD
© Olansi Healthcare Co.,Ltd • All Rights Reserved.
